Wasabi Wallet: Difference between revisions
| Line 31: | Line 31: | ||
=Send and Receive bitcoin via Wasabi Wallet= | =Send and Receive bitcoin via Wasabi Wallet= | ||
As explained above, Wasabi has '''mandatory coin | As explained above, Wasabi has '''mandatory coin labeling'''. This means that in order to send or receive bitcoin we have to specify custom labels for the address. These labels should be the name of the entities you transact with or who may have knowledge about the transaction. Properly annotated labels is one of the most important features in Wasabi Wallet; it will help you better manage your privacy by enabling the emergence of enhanced UTXO governance. A simple example of labeling is as follows: Alice pays you back for last night's pizza, so you label your receive address as ''Alice''. Now you have a record of the specific UTXO that Alice is aware of and can trace on the [[Block chain]]. | ||
'''Receiving Bitcoin''' | |||
# Click ''Receive'' button | |||
# Add Labels | |||
# Scan or copy the unused bitcoin address. | |||
'''Sending Bitcoin''' | |||
# Click ''Send'' button | |||
# Paste bitcoin address | |||
# Enter amount in BTC or USD | |||
# Add Labels | |||
# Preview Transaction (option to specify custom transaction fee rate) | |||
# Enter password. | |||
=CoinJoin via Wasabi Wallet= | =CoinJoin via Wasabi Wallet= | ||
Revision as of 14:45, 18 October 2022
Wasabi Wallet is an open-source, non-custodial, privacy-focused Bitcoin wallet for Desktop, that implements trustless CoinJoin. The CoinJoin coordinator (run by zkSNACKs Ltd., the company that is sponsoring the development of Wasabi) cannot steal from, nor breach the privacy of the participants.
The package includes built-in Tor and, by default, all traffic between the clients and the server goes through it, so IP addresses are hidden and privacy of the users is respected. Under normal conditions, Wasabi Wallet never leaves the Tor onion network and it never uses Tor exit relays, significantly decreasing the network attack surface.
Wasabi also includes all standard privacy tech like Hierarchical Deterministic wallets, address reuse avoidance, as well as mandatory coin labeling. The wallet uses BIP-158 Client-side block filtering to obtain its own transaction history in a private way and it has a one-click partial full node integration as it ships with Bitcoin Knots. If the user already has a Bitcoin full node on a local or remote device, then it is possible to specify the IP address and port, or the Tor onion service, and Wasabi will use it to verify and enforce the rules of Bitcoin.
In addition to this, it has advanced cutting-edges features like:
- Opt-in PayJoin
- Dust attack protections
- Custom change address
- Anti wallet fingerprinting
Wasabi has a complete and detailed documentation containing explanations on the architecture of the program, on its functioning and tutorials on how to use it. There is also a Tutorials Playlist on YouTube with short videos on how to use and interact with Wasabi Wallet.
Wasabi Wallet installation

Wasabi Wallet is easy to install. First, you have to go to https://wasabiwallet.io or http://wasabiukrxmkdgve5kynjztuovbg43uxcbcxn6y2okcrsg7gb6jdmbad.onion (for the onion service) and download the version for your own operating system. Wasabi is available in most operative systems with 64-bit architecture.
The officially supported OS are Linux, Windows and macOS, for the complete compatibility list you check the Wasabi Compatibility document. It is also possible to manually verify the PGP signatures and the deterministic builds.
For a step-by-step tutorial on the installation and PGP verification, you can follow the relevant chapter in the documentation.
Once the software is installed, icons will be created on the desktop and on the menu, you can click on them to open the program. If you have downloaded the .tar.gz version, then first extract it and then run the ./wassabee command.
Run Wasabi Wallet
When you run Wasabi for the first time, you will be prompted to generate a wallet. You have the option to create a new wallet, connect to a hardware wallet, import a wallet from a file, or recover a wallet with a 12 word seed. When you generate the wallet, you will then be prompted to choose a unique name for it; choose a name that you reflects the purpose of the wallet. If you create a new wallet you will be presented with 12 recovery words to record (BIP39), followed by the option to encrypt your wallet with a secure password (BIP38). You will always need the password in order to login to your wallet and whenever you spend your bitcoins, so remember to properly backup both the password and the 12 recovery words.
Send and Receive bitcoin via Wasabi Wallet
As explained above, Wasabi has mandatory coin labeling. This means that in order to send or receive bitcoin we have to specify custom labels for the address. These labels should be the name of the entities you transact with or who may have knowledge about the transaction. Properly annotated labels is one of the most important features in Wasabi Wallet; it will help you better manage your privacy by enabling the emergence of enhanced UTXO governance. A simple example of labeling is as follows: Alice pays you back for last night's pizza, so you label your receive address as Alice. Now you have a record of the specific UTXO that Alice is aware of and can trace on the Block chain.
Receiving Bitcoin
- Click Receive button
- Add Labels
- Scan or copy the unused bitcoin address.
Sending Bitcoin
- Click Send button
- Paste bitcoin address
- Enter amount in BTC or USD
- Add Labels
- Preview Transaction (option to specify custom transaction fee rate)
- Enter password.
CoinJoin via Wasabi Wallet

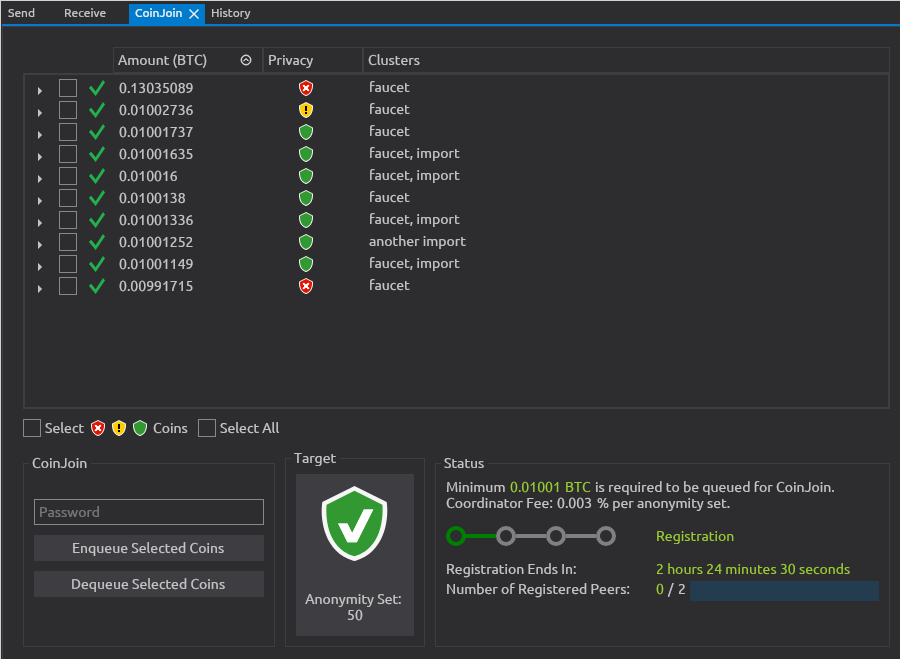
CoinJoins are probably the most important feature of Wasabi. Thanks to Schnorr blind signatures, (which is similar to the cryptography used in chaumian blind signatures and blinded bearer certificates) it is possible to run trustless (meaning nobody can steal) and private (meaning even the coordinator cannot spy) CoinJoins where anyone does not learn the linkage between the mixed transaction inputs and outputs.
Thanks to the technologies behind Wasabi, it is therefore possible make CoinJoin between Wasabi users without any liquidity provider middlemen. Users' wallets connect to a server which coordinates the CoinJoin, that is run by the zkSNACKs Ltd. company. The company sponsors the development of Wasabi Wallet and makes its income by taking a fee (0.003% * anonymity set) from each CoinJoin transaction. The anonymity set is essentially the size of the group you are coinjoining in. If 3 people take part in a CoinJoin (with equal size inputs) and there are 3 outputs then each of those output coins has an anonymity set of 3.
Wasabi allows you to make CoinJoins up to 100 peers. This means that a maximum of 100 anonsets can be earned per CoinJoin round. Of course, you can do multiple rounds, greatly increasing your total anonset (and, consequently, your privacy).