Electrum: Difference between revisions
Revert edit by User:Lindsey_Graham that changed the link to non-official (likely malicious) site Tag: Manual revert |
|||
| (83 intermediate revisions by 20 users not shown) | |||
| Line 1: | Line 1: | ||
[[Image:Electrum_logo.png]] | [[Image:Electrum_logo.png|400px]][[Image:Capture-Electrum404.jpg|thumb|500px|Electrum 4.0.4 on Windows 7 with showing zero balance and a connected state]] | ||
Electrum is a lightweight Bitcoin client, based on a client-server protocol. | [https://electrum.org Electrum] is a lightweight Bitcoin client, based on a client-server protocol. | ||
It was released on | It was released on 5 November 2011. | ||
== Main features == | |||
* Encrypted wallet: the file that contains bitcoin [[private keys]] is protected with a password, and never leaves the user's computer. | |||
* Deterministic key generation: If you lose your wallet file, you can recover it from its [[seed phrase|seed]]. You are protected from your own mistakes. (Note that Electrum's seed phrase is not according to the BIP39 standard.) | |||
* Encrypted wallet | * Instant on: by default the client does not download the blockchain, it requests that information from a server. No delays, always up-to-date. | ||
* Deterministic key generation | * Transactions are signed locally: Your private keys are not shared with the server. You do not have to trust the server with your money. | ||
* | * [[Cold storage]]: Keeping private keys offline is supported. Has a watch-only mode for online use. | ||
* | * [[Multi-signature]]: Dividing the power to spend coins between multiple wallets is supported. | ||
* [[Hardware wallet]] integration: Many leading hardware wallets can interface with Electrum, including [[Coldcard]], [[Trezor]] and [[Ledger]]. | |||
* Redundancy: You are not tied to a particular server, and the server does not need to know you. One server going down doesn't cause user downtimes. | |||
* No single point of failure: The server code is open source, anyone can run a server. Private keys can be exported and imported into other wallets. | |||
* Firewall friendly: The client does not need to open a port, it simply polls the server for updates. | * Firewall friendly: The client does not need to open a port, it simply polls the server for updates. | ||
* | * Free software: MIT License. Anyone can audit the code. | ||
* Python. | * Written in Python. The code is short, and easy to review. | ||
* Add-ons: third-party plugins are supported. | |||
* Support for Bitcoin URIs, signed URIs and Bitcoin aliases | |||
__TOC__ | __TOC__ | ||
=== | == Verifying Electrum Binaries == | ||
< | Electrum binaries can be downloaded from https://electrum.org/#download. Next to each download link there is also a signature file which can be downloaded. The signature files are for independently verifying the Electrum files were not tampered with. This step should not be overlooked as users have reported malicious funds-stealing builds of Electeum existing in the wild. | ||
</ | To verify the Electrm binaries using the signatures, you need to have GPG installed. Listed below is the process for each operating system. For all operating systems, you must have Electrum's signing key downloaded to verify the Electrum binaries. This can be downloaded from https://raw.githubusercontent.com/spesmilo/electrum/master/pubkeys/ThomasV.asc. | ||
=== Windows === | |||
Windows 10 has "Ubuntu on Windows" and allows you ton follow the Linux instructions [[#Linux|below]] | |||
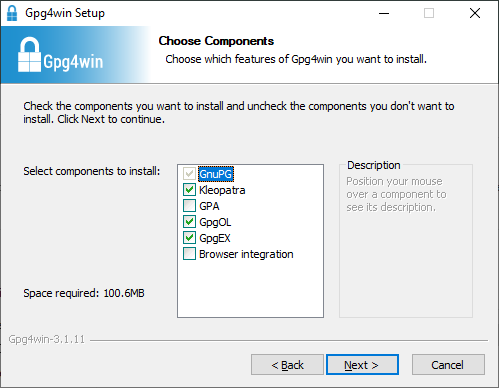
On Windows, you should install GPG4Win from this location: https://gpg4win.org/download.html. Once you run the installer, you will be presented with a "components choosing dialog like this: | |||
[[File:GPG4Win-Install.png]] | |||
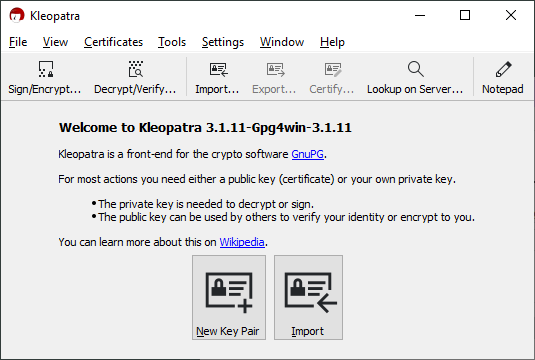
Leave the boxes ticked at their defaults and go to the next step of the installer. When the installation is finished, go to the Windows Start Menu and look for a program named "Kleopatra", and launch it. If you see the following window then GPG4Win has been successfully installed. | |||
[[File:GPG4Win-Kleopatra.png]] | |||
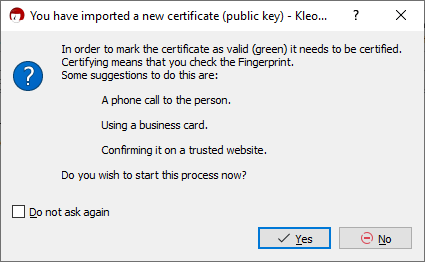
Click on the Import button, and navigate to the location you saved the Electrum signing key in (you may have to change the Filter at the bottom right to "All Files" to see the key). Then Kleopatra will give you a message requesting to certify the key: | |||
[[File:GPG4Win-Certify.png]] | |||
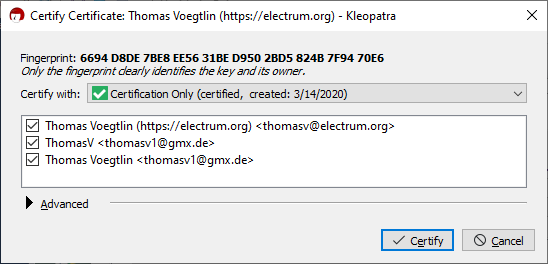
Click yes, and then tick all of the email addresses in the next window to finish the process. | |||
[[File:GPG4Win-Email.png]] | |||
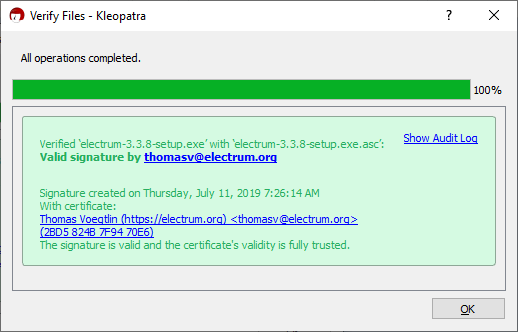
After you close the window by clicking the Certify button, click on the Decrypt/Verify button on the main window, and select the signature corresponding to the Electrum binary you have downloaded. If verification is successful, you will get the following window. Otherwise, the signature doesn't match the binary, and you need to download both of them again, and check the URL of the site you are downloading from. | |||
[[File:GPG4Win-Verify.png|none|frame|The Kleopatra message when signature verification succeeds.]] | |||
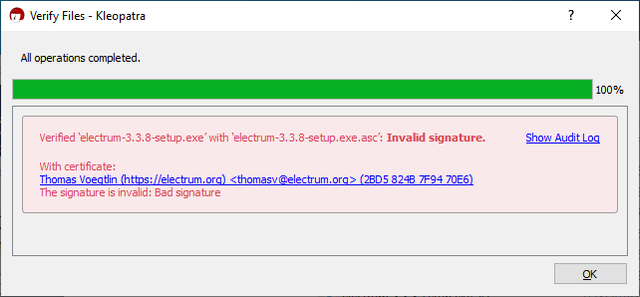
[[File:GPG4Win-VerifyFail.png|none|frame|The Kleopatra error message when signature verification fails.]] | |||
=== MacOS === | |||
On MacOS, you should use the GPG tools suite from GPGTools: https://gpgtools.org/. Download the .dmg file, double click on it and drag its contents to the Applications folder that appears to start the installation. | |||
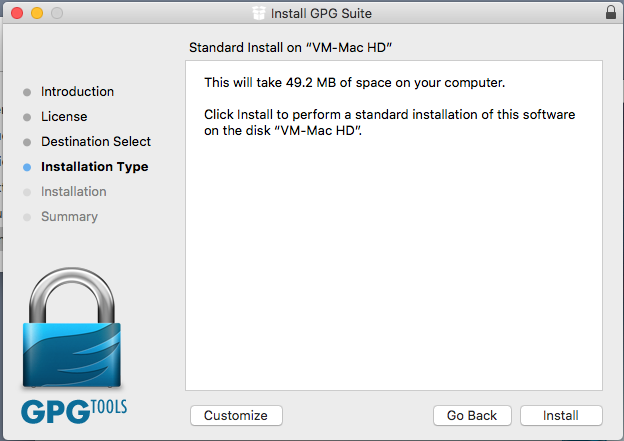
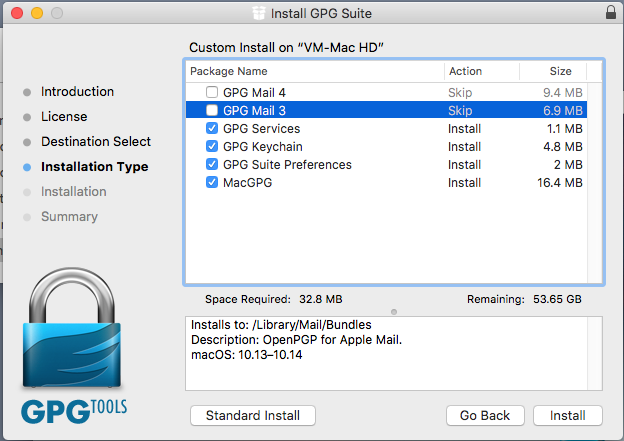
Inside the installer, click on the Customize button, and uncheck the boxes for the Mail clients. They are not necessary to verify signatures, and are trialware. | |||
[[File:GPGTools-Customize.png]][[File:GPGTools-Mail.png]] | |||
After the installer is finished, GPG Keychain should open automatically. If not, then open Finder and navigate to the Applications folder to open it yourself. You will be presented with this dialog: | |||
[[File:GPGTools-NewKey.png]] | |||
GPG Keychain needs to create a keypair to certify other public keys. Choose a name, email address and password that you will remember. Leave the rest of the options at their default and click on Generate Key. | |||
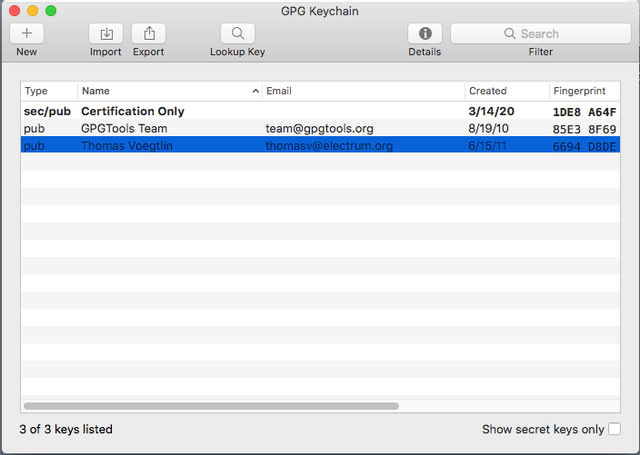
In the main window that appears, click on the Import button to import the Electrum signing key you downloaded. | |||
[[File:GPGTools-MainWindow.png]] | |||
Once it has been imported, double-click on the key to open its properties, and set its trust level to Full. | |||
[[File:GPGTools-Properties.png]] | |||
Then, you can just double click inside Finder on the Electrum signature for the corresponding binary to start GPG Keychain verification which will inform you about the result and whether the signature and binary are good or not. | |||
[[File:GPGTools-Verify.png|none|frame|The GPG Keychain message when signature verification succeeds.]] | |||
[[File:GPGTools-VerifyFail.png|none|frame|The GPG Keychain error message when signature verification fails.]] | |||
=== Linux === | |||
On Linux, the <code>gpg</code> command line program is preinstalled in most distributions. If for some reason it's not, look for a package called "gnupg", "gpg" or "gpg2" in your package manager. | |||
Once that's done with, you run the following GPG commands to import and trust the key which Electrum binaries are signed with, and the signature files are made from: | |||
<code>gpg --import /<path>/<to>/<file>/<location>/ThomasV.asc</code> | |||
[[File:GPG-Import.png]] | |||
<code>gpg --sign-key 6694D8DE7BE8EE5631BED9502BD5824B7F9470E6</code> | |||
Then you download the Electrum program and its signature to the same folder, and check its authenticity with the following GPG command: | |||
<code>gpg --verify /<path>/<to>/<file>/<location>/<filename>.asc</code> | |||
This is the path to the signature file you downloaded. If verification succeeds, you will get output indicating that the verification was successful. | |||
[[File:GPG-Verify.png|none|frame|The GPG message when signature verification succeeds.]] | |||
[[File:GPG-VerifyFail.png|none|frame|The GPG message when signature verification fails.]] | |||
==Documentation== | |||
Documentation is hosted on http://docs.electrum.org/. | |||
It includes tutorials for the multi-signature, cold storage and hardware wallet features. | |||
==History== | |||
Electrum was announced 5 November 2011.<ref>[http://bitcointalk.org/index.php?topic=50936.0 Electrum - a new thin client]</ref>. It has since gone through many changes in each version. | |||
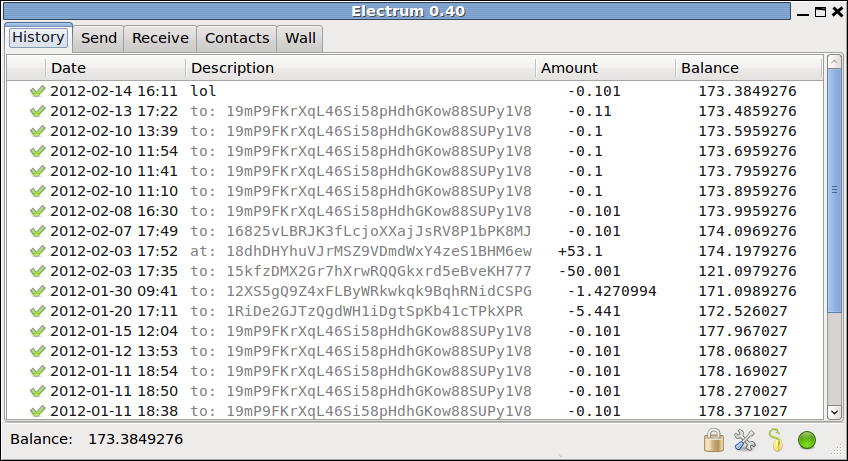
[[Image:Capture-Electrum.png|thumb|500px|An early version of Electrum with its Qt GUI]] | |||
Version 1.7 added support for third-party plugins. | |||
Version 2.0 introduced support for the [[Trezor]] hardware wallet, TrustedCoin 2FA, [[multisig]] wallets and changed the way the wallet files are stored by using [[BIP_0032|BIP32]] derivation. These wallets are incompatible with older versions. | |||
Version 2.4.3 added support for the [[Hardware_wallet#KeepKey:_Your_Private_Bitcoin_Vault|KeepKey]] hardware wallet. | |||
Version 2.6 introduced the new Kivy GUI for the Android client. | |||
Version 2.7 added a fee slider, [[RBF]] functionality and support for [[Hardware_wallet#Ledger_Nano_S|Ledger Nano S]]. The wallet format has also been changed, making them incompatible with older versions. | |||
Version 3.0 introduced a new server protocol and support for generating [[Segwit]] wallets. | |||
On December 27, 2018, an advisory was published<ref>[https://bitcointalk.org/index.php?topic=5090097.0 Electrum vulnerability allows arbitrary messages, phishing]</ref> about a phishing vulnerability where the server returns a a fake update message after a transaction is broadcasted, with a link to a phishing domain with a malicious Electrum binary. Users who ran the malicious binary reported theft of all bitcoin funds. A mitigation was applied in version 3.2.1 which renders the rich-text message in plain-text, making it less convincing. | |||
Version 4.0.0 introduced support for [[Lightning Network]] wallets. | |||
== Server software == | |||
The server code is open source, anyone can run a server. There are several implementations. | |||
Public Electrum servers run by strangers can easily spy on Electrum users. For this reason many people run their own server. For maximum [[Full node#Why should you use a full node wallet|trustlessness, privacy and security]]; users should point Electrum to their own servers. | |||
=== bwt === | |||
'''bwt''' is a lightweight and performant HD wallet indexer backed by a bitcoin full node that [https://github.com/shesek/bwt#electrum-plugin can also be installed as an Electrum plugin]. | |||
=== | === ElectrumX === | ||
ElectrumX is the latest iteration of general purpose Electrum servers. Written in Python, it tries to be as efficient as possible to keep synchronization times low. ElectrumX is able to serve thousands of clients at once, it is suited to be an always-on server that contributes to bitcoin. Make sure that the version of ElectrumX you download supports Bitcoin. As of May 2020 some versions of ElectrumX only support [[altcoin]]s. | |||
GitHub: https://github.com/spesmilo/electrumx | |||
<!-- seems less relevant now... not sure | |||
Interview with author: https://btcmanager.com/nobody-has-setup-an-electrum-server-for-over-a-year/ archive: https://archive.is/lUnfa --> | |||
=== Electrum Personal Server === | |||
Electrum Personal Server has a different approach to a normal server. It is intended to be used by a single person only. Instead of creating a database of every transaction and address ever used on the bitcoin blockchain, Electrum Personal Server only tracks the user's own wallets. This allows it to be much more efficient with resources, it does not need any extra data files and is compatible with [[Bitcoin Core]]'s pruning feature. | |||
and | |||
Electrum Personal Server is probably the best way to combine Electrum's feature-richness (hardware wallet integration, multi-signature, [[seed phrase]], etc) with a [[full node]]'s strong security and privacy. | |||
GitHub: https://github.com/chris-belcher/electrum-personal-server | |||
== | ==See also== | ||
* [[Thin Client Security]] | |||
* [[Hardware wallet]] | |||
* [[Seed phrase]] | |||
* [[Multi-signature]] | |||
* [[Cold storage]] | |||
== | ==External Links== | ||
* [http://electrum.org/ Electrum] project website | |||
* [https://github.com/spesmilo/electrum/ Electrum] project source | |||
=== | ==References== | ||
<references /> | |||
[[ | [[Category:Clients]] | ||
[[Category:Open Source]] | |||
Latest revision as of 05:46, 10 December 2024
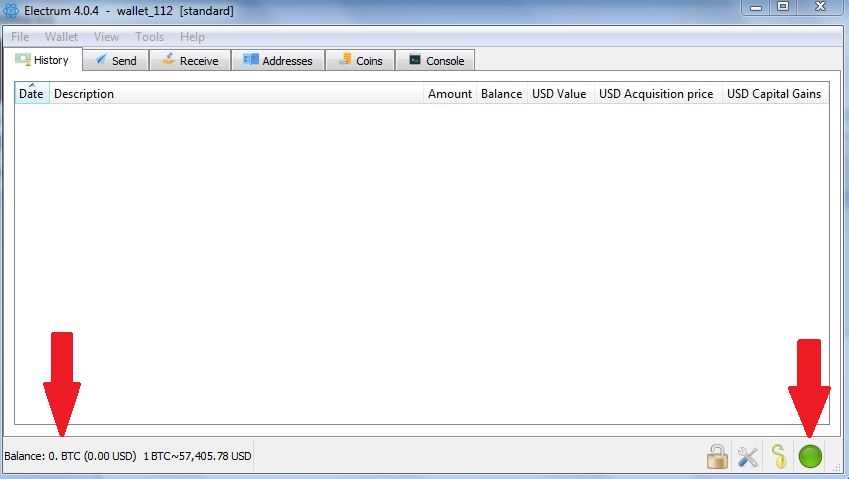
Electrum is a lightweight Bitcoin client, based on a client-server protocol. It was released on 5 November 2011.
Main features
- Encrypted wallet: the file that contains bitcoin private keys is protected with a password, and never leaves the user's computer.
- Deterministic key generation: If you lose your wallet file, you can recover it from its seed. You are protected from your own mistakes. (Note that Electrum's seed phrase is not according to the BIP39 standard.)
- Instant on: by default the client does not download the blockchain, it requests that information from a server. No delays, always up-to-date.
- Transactions are signed locally: Your private keys are not shared with the server. You do not have to trust the server with your money.
- Cold storage: Keeping private keys offline is supported. Has a watch-only mode for online use.
- Multi-signature: Dividing the power to spend coins between multiple wallets is supported.
- Hardware wallet integration: Many leading hardware wallets can interface with Electrum, including Coldcard, Trezor and Ledger.
- Redundancy: You are not tied to a particular server, and the server does not need to know you. One server going down doesn't cause user downtimes.
- No single point of failure: The server code is open source, anyone can run a server. Private keys can be exported and imported into other wallets.
- Firewall friendly: The client does not need to open a port, it simply polls the server for updates.
- Free software: MIT License. Anyone can audit the code.
- Written in Python. The code is short, and easy to review.
- Add-ons: third-party plugins are supported.
- Support for Bitcoin URIs, signed URIs and Bitcoin aliases
Verifying Electrum Binaries
Electrum binaries can be downloaded from https://electrum.org/#download. Next to each download link there is also a signature file which can be downloaded. The signature files are for independently verifying the Electrum files were not tampered with. This step should not be overlooked as users have reported malicious funds-stealing builds of Electeum existing in the wild.
To verify the Electrm binaries using the signatures, you need to have GPG installed. Listed below is the process for each operating system. For all operating systems, you must have Electrum's signing key downloaded to verify the Electrum binaries. This can be downloaded from https://raw.githubusercontent.com/spesmilo/electrum/master/pubkeys/ThomasV.asc.
Windows
Windows 10 has "Ubuntu on Windows" and allows you ton follow the Linux instructions below
On Windows, you should install GPG4Win from this location: https://gpg4win.org/download.html. Once you run the installer, you will be presented with a "components choosing dialog like this:
Leave the boxes ticked at their defaults and go to the next step of the installer. When the installation is finished, go to the Windows Start Menu and look for a program named "Kleopatra", and launch it. If you see the following window then GPG4Win has been successfully installed.
Click on the Import button, and navigate to the location you saved the Electrum signing key in (you may have to change the Filter at the bottom right to "All Files" to see the key). Then Kleopatra will give you a message requesting to certify the key:
Click yes, and then tick all of the email addresses in the next window to finish the process.
After you close the window by clicking the Certify button, click on the Decrypt/Verify button on the main window, and select the signature corresponding to the Electrum binary you have downloaded. If verification is successful, you will get the following window. Otherwise, the signature doesn't match the binary, and you need to download both of them again, and check the URL of the site you are downloading from.
MacOS
On MacOS, you should use the GPG tools suite from GPGTools: https://gpgtools.org/. Download the .dmg file, double click on it and drag its contents to the Applications folder that appears to start the installation.
Inside the installer, click on the Customize button, and uncheck the boxes for the Mail clients. They are not necessary to verify signatures, and are trialware.
After the installer is finished, GPG Keychain should open automatically. If not, then open Finder and navigate to the Applications folder to open it yourself. You will be presented with this dialog:
GPG Keychain needs to create a keypair to certify other public keys. Choose a name, email address and password that you will remember. Leave the rest of the options at their default and click on Generate Key.
In the main window that appears, click on the Import button to import the Electrum signing key you downloaded.
Once it has been imported, double-click on the key to open its properties, and set its trust level to Full.
Then, you can just double click inside Finder on the Electrum signature for the corresponding binary to start GPG Keychain verification which will inform you about the result and whether the signature and binary are good or not.


Linux
On Linux, the gpg command line program is preinstalled in most distributions. If for some reason it's not, look for a package called "gnupg", "gpg" or "gpg2" in your package manager.
Once that's done with, you run the following GPG commands to import and trust the key which Electrum binaries are signed with, and the signature files are made from:
gpg --import /<path>/<to>/<file>/<location>/ThomasV.asc
gpg --sign-key 6694D8DE7BE8EE5631BED9502BD5824B7F9470E6
Then you download the Electrum program and its signature to the same folder, and check its authenticity with the following GPG command:
gpg --verify /<path>/<to>/<file>/<location>/<filename>.asc
This is the path to the signature file you downloaded. If verification succeeds, you will get output indicating that the verification was successful.


Documentation
Documentation is hosted on http://docs.electrum.org/.
It includes tutorials for the multi-signature, cold storage and hardware wallet features.
History
Electrum was announced 5 November 2011.[1]. It has since gone through many changes in each version.
Version 1.7 added support for third-party plugins.
Version 2.0 introduced support for the Trezor hardware wallet, TrustedCoin 2FA, multisig wallets and changed the way the wallet files are stored by using BIP32 derivation. These wallets are incompatible with older versions.
Version 2.4.3 added support for the KeepKey hardware wallet.
Version 2.6 introduced the new Kivy GUI for the Android client.
Version 2.7 added a fee slider, RBF functionality and support for Ledger Nano S. The wallet format has also been changed, making them incompatible with older versions.
Version 3.0 introduced a new server protocol and support for generating Segwit wallets.
On December 27, 2018, an advisory was published[2] about a phishing vulnerability where the server returns a a fake update message after a transaction is broadcasted, with a link to a phishing domain with a malicious Electrum binary. Users who ran the malicious binary reported theft of all bitcoin funds. A mitigation was applied in version 3.2.1 which renders the rich-text message in plain-text, making it less convincing.
Version 4.0.0 introduced support for Lightning Network wallets.
Server software
The server code is open source, anyone can run a server. There are several implementations.
Public Electrum servers run by strangers can easily spy on Electrum users. For this reason many people run their own server. For maximum trustlessness, privacy and security; users should point Electrum to their own servers.
bwt
bwt is a lightweight and performant HD wallet indexer backed by a bitcoin full node that can also be installed as an Electrum plugin.
ElectrumX
ElectrumX is the latest iteration of general purpose Electrum servers. Written in Python, it tries to be as efficient as possible to keep synchronization times low. ElectrumX is able to serve thousands of clients at once, it is suited to be an always-on server that contributes to bitcoin. Make sure that the version of ElectrumX you download supports Bitcoin. As of May 2020 some versions of ElectrumX only support altcoins.
GitHub: https://github.com/spesmilo/electrumx
Electrum Personal Server
Electrum Personal Server has a different approach to a normal server. It is intended to be used by a single person only. Instead of creating a database of every transaction and address ever used on the bitcoin blockchain, Electrum Personal Server only tracks the user's own wallets. This allows it to be much more efficient with resources, it does not need any extra data files and is compatible with Bitcoin Core's pruning feature.
Electrum Personal Server is probably the best way to combine Electrum's feature-richness (hardware wallet integration, multi-signature, seed phrase, etc) with a full node's strong security and privacy.
GitHub: https://github.com/chris-belcher/electrum-personal-server

