CM1Quickstart
Enterpoint CM1 quickstart guide
This guide assumes you are using Microsoft Windows and intend to mine using MPBM or CGminer.
Each CM1 needs a 12v DC power supply capable of delivering 60w (5A). For testing purposes use a 6 pin PCIe or 4 pin Molex connector from your PC power supply, or a good quality external PSU with a 2.5mm center positive power connector.
1. Gather required support materials
You will need to download the following files to configure the CM1:
Early CM1 bitstreams and instructions
Extract all the files in cm_ftdi_drivers.zip, CAIRNSMORE1_CONTROLLER_SHARING_V1_5.zip and CairnsmoreProgramming.zip to any folder e.g. create a 'cm1' folder in your user directory.
Save this file in the same folder as the extracted files above.
(compressed with 7zip, available here)
Extract the files in dcmwd4e-20120822.7z onto a USB pen drive for later use with the VirtualBox tools. Leave the USB pen drive connected.
You will need to download the following files to mine with the CM1:
For BFGMiner
For MPBM
prepackaged python runtime windows-runtime-v0.1.0beta.zip
Extract the contents of windows-runtime-v0.1.0beta.zip to any folder e.g. create an 'mpbm' folder in your user directory.
Download the latest MPBM as a ZIP archive from MPBM GitHub by clicking on the [ZIP https://github.com/TheSeven/Modular-Python-Bitcoin-Miner/zipball/testing] icon.
Extract the files into the 'mpbm' directory so that 'readme.txt' and the associated folders are in the same directory as 'mpbm.exe'.
Please read the MPBM topic on bitcointalk.org for updates to the linked files and for additional guidance.
For CGMiner
(compressed with 7zip, available here)
Extract the files into a 'cgminer' folder in your user directory.
Please read the CGMiner topic on bitcointalk.org for additional guidance.
2. Tool installation and CM1 programming
Start the VirtualBox installer and accept the default settings. During the installation you will be prompted to install uncertified drivers - select 'Continue Anyway' to each prompt. Once installation is complete, open VirtualBox and select 'File' -> 'Import Appliance'. Browse to the 'cm1' folder and select 'cairnsmore.ova'. Accept the default options and once complete, start the virtual machine by clicking the 'Start' icon.
Once the VM has started, login with username 'root' and password 'password'.
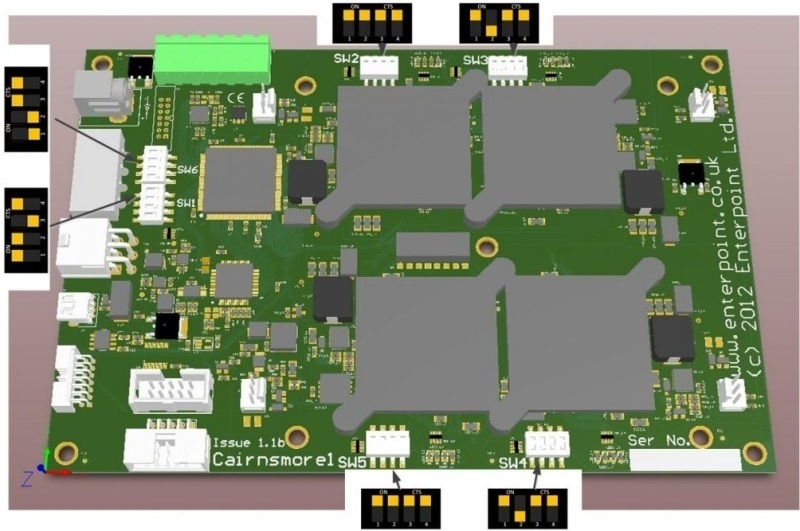
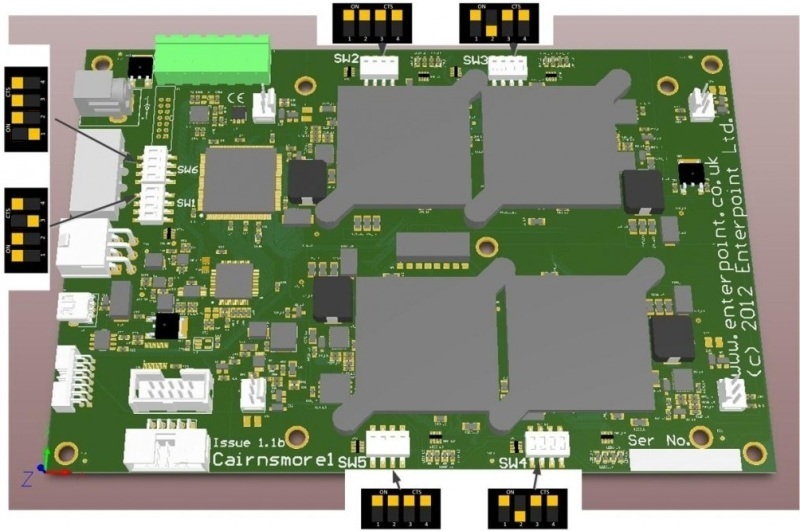
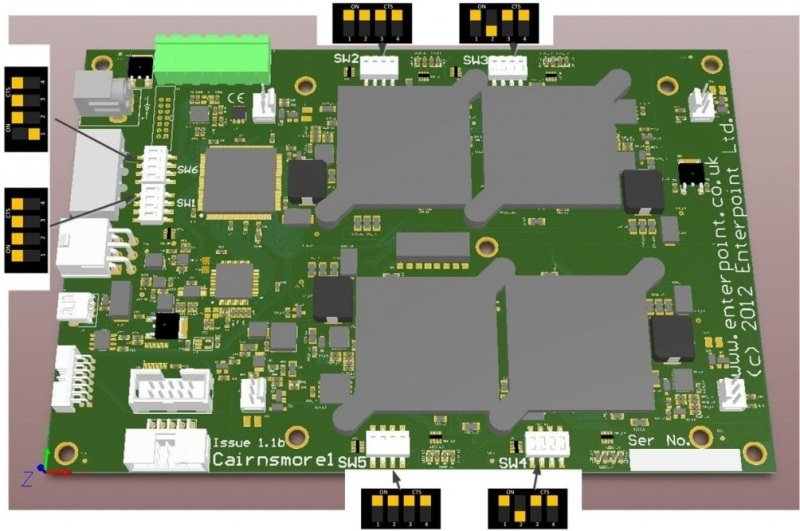
Set the DIP switches on the CM1 to the following configuration:
Connect the CM1 to the power supply and wait 2 minutes for the controller to start and initialize all four FPGA's
If you have enough ports, connect the CM1 to a USB port on the motherboard (not a port on a header plate). Alternatively, use a high quality powered USB hub.
Windows will detect the presence of a new device and attempt to locate a driver file. This may take some time but will fail.
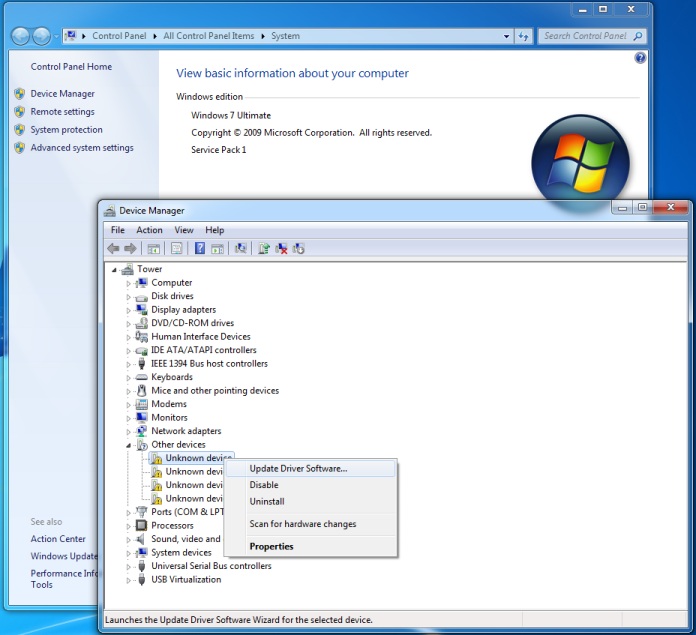
Open the 'Device Manager' from:
'Start' -> 'Control Panel' -> 'System' -> 'Device Manager'
You should see four unknown devices :
Right-Click on the first one and select 'Update Driver Software' -> 'Browse my computer for driver software'
Click the 'browse' button and navigate to the folder containing the drivers e.g. 'C:\Users\Steve\cm1\cm_ftdi_drivers'
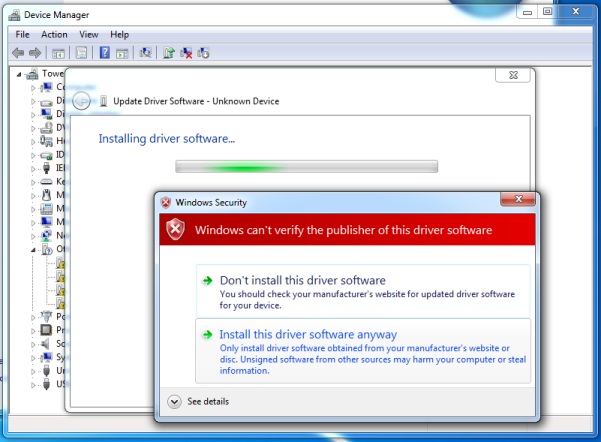
Click 'Next'. As the driver is unsigned, Windows will prompt you for permission to continue:
Click 'Install this driver software anyway'
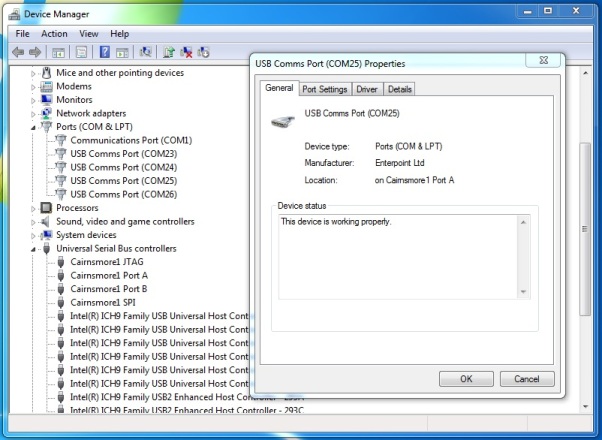
Once complete, you will need to repeat the first two steps for the remaining three devices. When the drivers have been completely installed the Device Manager will show eight devices - 4 COM ports and 4 USB devices
Right click to check the properties of each COM port and note down the ones that correspond to Cairnsmore 1 Port A & B
In this example, they are COM25 & COM26
Controller Upgrade
From the start menu, select 'All Programs' -> 'Accessories' -> 'Command Prompt'
Type the following commands:
cd cm1
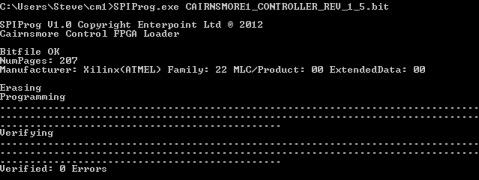
SPIProg.exe CAIRNSMORE1_CONTROLLER_REV_1_5.bit
The terminal should show the following output:
Once complete with no reported errors, disconnect the USB cable and then the PSU. If errors occur DO NOT POWER DOWN - re-run the command.
Please read 'Cairnsmore1_Controller_Upgrade_Procedure.pdf' from 'CAIRNSMORE1_CONTROLLER_SHARING_V1_5.zip' for more detailed information.
Bitstream Upgrade
Set the DIP switches on the CM1 to the following configuration:
Connect the PSU. Wait 2 minutes and then reconnect the USB cable.
In the VM window, select 'Devices' -> 'USB Devices' and enable 'FTDI Cairnsmore1 [800]' and the device for your USB drive.
In the VM, enter the following commands:
Depending on how your USB drive is formatted you will need to use a variation of the following command to 'mount' the filesystem.
mount –t auto /dev/sdb /mnt
also try:
-t vfat
/dev/sdb1
When successful, the command will return without reporting an error. Copy the files with:
cp /mnt/*.bit .
ls
The 'shortfin_dcmwd4e' files should be listed.
Run the following command:
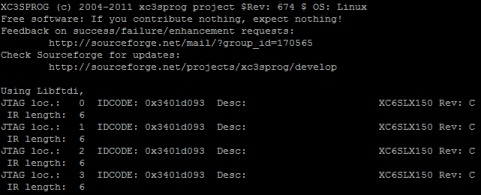
xc3sprog -c cm1 -v -j
The output should look like:
Run the following commands:
xc3sprog -c cm1 -v -p0 -Ixc6lx150.bit -e
xc3sprog -c cm1 -v -p1 -Ixc6lx150.bit -e
xc3sprog -c cm1 -v -p2 -Ixc6lx150.bit -e
xc3sprog -c cm1 -v -p3 -Ixc6lx150.bit -e
No errors should have been reported.
Optionally disconnect and power down the CM1 with a 2 minute wait between powering up and reconnecting the USB cable. (This sometimes helps with stability issues)
Now run the following commands, checking for a successful verify before proceeding to the next.
xc3sprog -c cm1 -p3 -Ixc6lx150.bit shortfin_dcmwd4e_ed_test_220_overclock.bit
xc3sprog -c cm1 -p2 -Ixc6lx150.bit shortfin_dcmwd4e_ed_test_220_overclock.bit
xc3sprog -c cm1 -p1 -Ixc6lx150.bit shortfin_dcmwd4e_ed_test_220_overclock.bit
xc3sprog -c cm1 -p0 -Ixc6lx150.bit shortfin_dcmwd4e_ed_test_220_overclock.bit
After each command the output should look like:
If all four commands are successful, disconnect and power down the CM1.
Please read 'VirtualBox Installation Windows.pdf' from 'CairnsmoreProgramming.zip' for more detailed information.
3. Mining software configuration
Set the DIP switches on the CM1 to the following configuration:
Connect the PSU. Wait 2 minutes and then reconnect the USB cable.
If VirtualBox is still running, it will connect to the CM1 - In the VM window, select 'Devices' -> 'USB Devices' and disable 'FTDI Cairnsmore1 [800]' or shut it down before reconnecting the USB cable.
Using BFGMiner
Just run "bfgminer"
The first time, it will prompt you for pool information. Once you are happy with it working, go to the (S)ettings menu, and (W)rite the config file. If you use the default path (you might need to create it first), it will automatically load the config the next time.
Using MPBM
Start mpbm.exe. A terminal window will open displaying log information. Minimize the window.
Start Google Chrome/Apple Safari or another Webkit based browser and enter the url: 127.0.0.1:8832
You will be prompted to enter authentication - enter username: 'admin', password: 'mpbm'. You should change these default values.
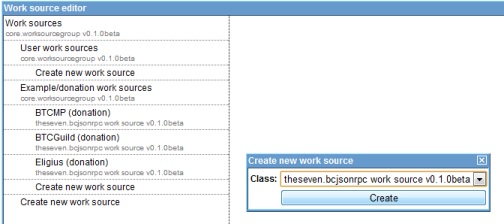
Click 'Work Sources' -> 'Create new work source' of type 'theseven.bcjsonrpc':
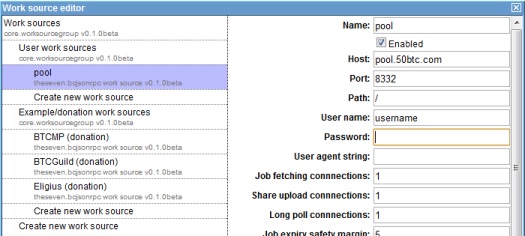
And configure it with the host, username and password for your preferred pool, and save the settings:
Then click 'Workers' and create two new workers of type 'theseven.icarus' and configure the COM ports correctly for CM1 port A & B, saving each setting.
e.g to specify COM26 enter
\\.\COM26
If you have multiple CM1 boards, you may find it helpful to enter the serial number and port of each board in the name field.
MPBM should start assigning work to the workers from the pool and after a while the statistics should give you an idea of how the CM1 is performing:
Using CGMiner
Start 'notepad' and paste in the following text, substituting the correct values for pool URL, username and password, and the CM1 COM ports :
cgminer-fpgaonly.exe -o http://pool.50btc.com:8332 -u "username" -p "" -S "\\.\COM25" -S "\\.\COM26" --icarus-timing long
Select 'file type *.* and the save the file as 'start.bat' within the 'cgminer' directory.
Double-click the 'start.bat' file to start mining.
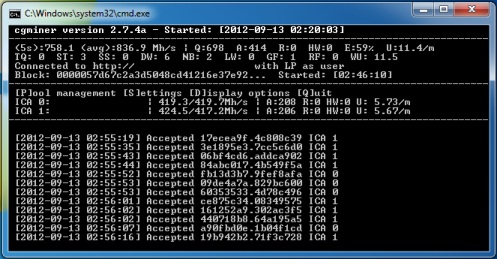
The output should eventually settle and show statistics similar to:
4. Performance tuning and troubleshooting
After the mining program has been running for at least 10 minutes, check the invalid shares count. If they are above 10% of the accepted shares, the bitstream is unsuitable for your CM1 board (this is more common in boards made early on in the development cycle).
If only one worker has high invalids then you only need to reprogram two of the four FPGA's The highest numbered COM port (port B) corresponds to FPGA's 3 & 2, and the other COM port corresponds to FPGA's 1 & 0 Refer to the settings and determine which worker corresponds with which port and thus which pair of FPGA's
Repeat the programming steps in Section 2 : Bitstream Upgrade, specifying a different bitstream for the programming commands (e.g. if the board is currently using 'shortfin_dcmwd4e_ed_test_220_overclock.bit', try running the board after reprogramming with 'shortfin_dcmwd4e_ed_test_210_overclock.bit')
The '-p' argument specifies which FPGA the command erases or programs - only issue the commands for the FPGA's you wish to change.
Repeat these steps until the invalid count is below 10%, and then check on performance again after 24hrs. If the board stops hashing, try a slower bitstream.
Other common problems
Mining can be interrupted if another USB device is inserted or removed from the PC. additionally, remove any non-essential USB devices as their traffic may interfere.
Running multiple CM1 boards on a single PC requires a good quality powered USB hub and good quality USB cables that aren't too long.
Make sure the CM1 boards are well ventilated - try and maintain an ambient temperature around the boards well below 30 degs C
The Cairnsmore CM1 discussion thread on bitcointalk.org contains detailed discussions on problems and solutions and if you can't find the answer, ask!
